WOWOWOWOWOWOW – It has been WAAAAAAY TOOOOOO LOOOOOONG since I have posted here. So much to catch up my (checks notes) zero readers on about my life.
I retired from my “regular” job earlier this year and decided to give a good old college try (see what I did there?) at voiceover. I have been able to find some work in VO mostly in audiobooks but a few other gigs as well. It’s fun and interesting…and also hard to take all of the rejection.
But, it also is more technology to explore and see what I can do with it. Since I am always looking for ways to be more efficient with the tech I use, I naturally turned to how I could do this with my recording booth. So, here’s a post I wrote on my VO site (ajwmsvoices.com) that I figured could also live over here.
In my former (and apparently current) life as an educational technologist, I was always looking for ways to use technology to make life easier (or at least my work more efficient) for both the faculty and staff I supported as well as myself. This led me to all kinds of tools like text expanders and using sites like delicio.us back in “the day.”
So, why should retirement from that job and moving into voiceover be any different? I have always enjoyed audio editing when I had a chance to do it during my career and had a fledgling podcast going for a while with another ed tech person. Moving into longer form narration with audiobooks meant I needed to find ways to make the editing process as efficient as possible. And, once I learned about punch and roll recording within Twisted Wave, I also wanted to be more efficient in the booth.
My computer is right outside of my booth (which is great) and I have a wireless keyboard and mouse that I was moving back and forth to edit and record. That got annoying because I would forget one or both of those items and had to get up and go get it…so I put a wired mouse back on my desk and just leave the wireless mouse in the booth. And, I can use the mouse to pull down menus in Twisted Wave to start/stop recording, add markers, etc.
But, another efficiency I ALWAYS use is keeping my hands on the keyboard and using keyboard shortcuts over the mouse. Adding new keyboard shortcuts in Twisted Wave is SUPER easy to do. I had already added a bunch to my install so I could be efficient during editing. And….of course, using the mouse was slower in the booth.
Somehow and someway (I wish I could give credit – probably someone in a VO group in Facebook or a Twitter person), I learned about Touch Portal, a free macro tool that allows you to control your desktop with a mobile device. So, I installed it on my Mac Mini and on my iPhone…don’t worry it also works on Windows and Android as well as the Apple ecosystem. If you just want to jump right in – here is the two page application I built:
AJWmsVoices-TouchPortal-TWBoothAssistantDownload
If you are intrigued, here is how I built my Touch Portal application to allow me to work in the booth without having to move my keyboard back and forth.
Step One: Note and/or Create Keyboard Shortcuts
The tasks I needed in the booth included some for recording and some for doing quick web searches for pronunciations if I missed one. Some of these actions already had keyboard shortcuts and some I had to add within TW.
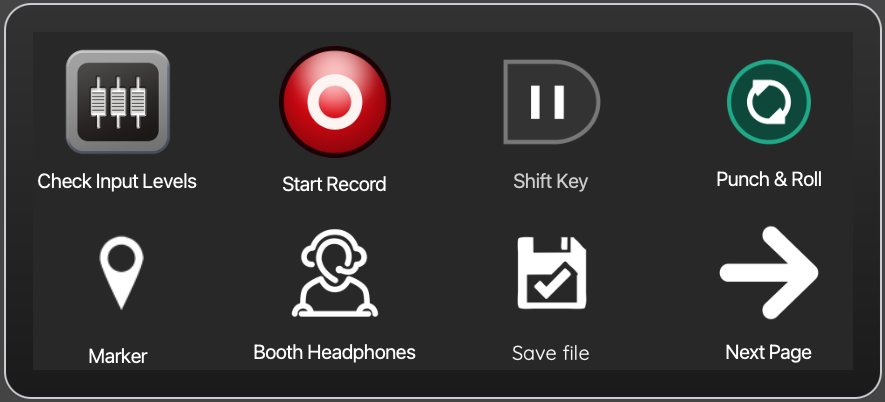
- Check Input Levels (I mapped to Ctrl+I)
- Start Record (set as Cmd+R)
- Shift Key (to stop recording) – (shift key, natch!)
- Punch In Recording – (I mapped to P)
- Place Marker – (set as M)
- Select Booth Headphones as Output Audio in TW (moving back and forth, I needed a quick way to change that output – so I mapped to B)
- Save File (set as Cmd+S)
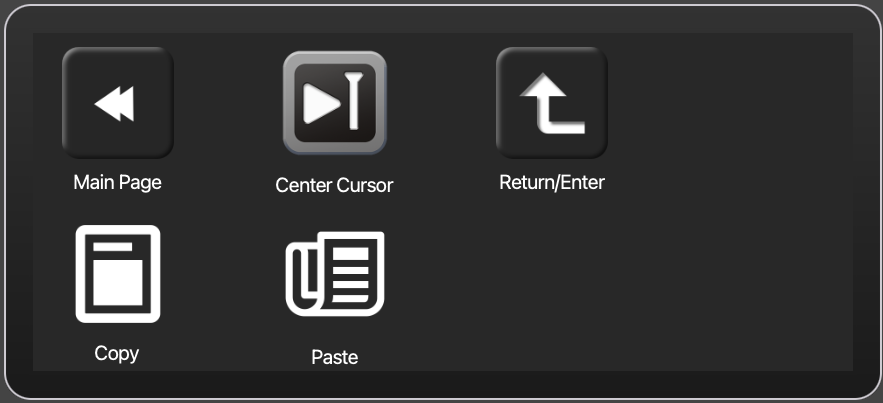
- Center on Cursor (I mapped as C)
- Return/Enter (Enter/Return key, of course!)
- Copy (set as Cmd+C)
- Paste (set as Cmd+V)
Step Two: Create Touch Portal Pages
Once I had the Touch Portal desktop and iOS installs talking to each other, I created a new project and built buttons for each one of the actions above. There is a limit with the free version of eight buttons per page and two pages. This works for my needs but be aware that you have to use one button spot on each page to move back and forth between the pages.
I grouped my buttons on page one to be the ones I use during recording. Page two was more for the copy paste when I selected a word in a script and then had to paste it into a browser to search, etc. Yes, I know that I can also use the right click menus and I probably will some but I just wanted to add them to the Touch Portal because I could!
To create each button, you basically:
- Click the Plus sign to add a new button. This opens the Button Edit screen.
- Create the button’s look and feel
- Define the button’s action (keyboard actions were all of mine for this project)

Using the Touch Portal
Once this was in place, I put into production. When I go into my booth, I open up the Touch Portal app on my iPhone (I also have set up Do Not Disturb to become active when I am running Touch Portal so I don’t get any text/email notifications and noises while I’m recording – that’s another post for another day). The Touch Portal buttons are there for me to use while I am setting up and recording. I touch Booth Headphones to ensure that that output is correct. Then, I touch Start Record (be sure TW is the active window!). If I make a mistake, I touch the Shift Key to pause recording. I then use my mouse to move the cursor to where I want to start the Punch and Roll and then touch that button. For some jobs, I know I will be splitting the files by Marker so I touch that button to drop a marker as needed. And, of course, when I am finished, I touch Save File.
Page One
Page Two
Feel free to download the two pages and make them your own!