Well, since the end of the world as we know it might be tomorrow, I thought I had better share the experiences of remodeling the kitchen over the past 2 years.
Why 2 years? Good question! After the mortgage was paid off (yay!), we decided that it was time to update the kitchen and we could save up for each part and not go into debt to do the job.
Many brainstorming sessions, dreaming up ideas over coffee in the morning and flipping through design books and magazines and watching HGTV for hours, the ideas started bubbling up to the top as well as a determination to follow two “rules” as much as possible:
- Rule 1: Use local businesses
- Rule 2: Be as sustainable and green as possible
In addition, we wanted to be as fiscally responsible as possible but not choose cheap simply for the cost.
So, first up, cabinets and the flooring. Many kitchen remodeling shows start with the studs on the show ripping everything out to the studs in the house. The cabinets were in fine shape so it seems wasteful to trash them simply to replace them. New hardware and paint has really spruced them up and filling in the small grooves on the doors that gave them a country feel before painting put them back into a more sleek line that I liked.
However…since this entire project was kickstarted by a leak under the sink that resulted in a slow softening of the wood under the sink cabinet and into the kitchen itself, we knew we had to replace that cabinet. And, this was the first place where we didn’t really follow the rules (what? already?) but we did take advantage of zero percent financing and bought energy star appliances and the replacement cabinet from a big box home improvement store. We did add three more cabinets to the kitchen in the process to give us hidden space for recycling, storage for baking supplies and a bit more storage for keys and so on. We also splurged on a new door with better insulation and a window to allow for more natural light.
Flooring
Cork or bamboo was our first instinct for flooring but a very nice salesperson at Broadway Carpet told us that they were both too soft for kitchen use, in her opinion. We figured since she was losing a sale but was being honest, we needed to heed that. I had wanted REAL linoleum based on a suggestion from my sister but I couldn’t find that locally. A trip to Asheville, North Carolina to the green building store, Build it Naturally, provided us with Marmoleum in a nifty click to install system and so we were off with our Sahara floor and an inset of blue for a “rug” under the table.
While the floor and new cabinets were going in, I tackled my own personal project – a wine rack made completely from found materials around the house. I gathered up scraps of wood from past projects and dug up all kinds of fasteners and devised a holder that would fit in the “dead” space between the end of one cabinet and where we wanted the return on another new cabinet to be. The results can be seen here:
I also repurposed a knife holder from the side of a rolling butcher block island and hung it up between our cabinets and the new refrigerator to fill that space and provide a needed knife storage area.
Countertops
Then, we had to decide on countertops. Working with Southern Kitchen, we met Karen, our wonderful designer. The original choice was a gorgeous cobalt blue Ceasarstone, which is a crushed quartz eco-friendly material. However, to save up for the project took over a year and by the time we went back to order it, the color was no longer being made! Boo!
We had to setting for our second choice, this time by Silestone – Stellar Marine in their Stellar best kitchen knives series. Lovely sparkles inside the blue. We used Stone Creek Surfaces our of Louisville, TN as our installers and they were great. Project was on time, installers were professional and they even figured out a way to keep our smaller than usual (24″) dishwasher in place.
So, we went from this:

with makeshift countertops on the new cabinets and old formica on the existing, to this:
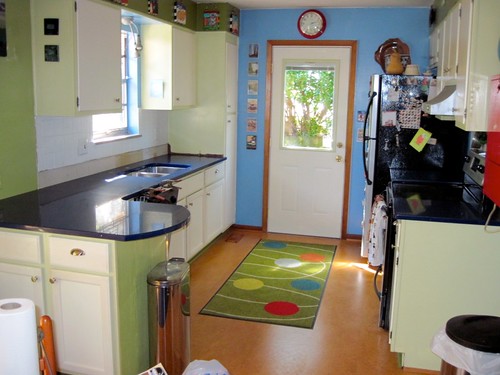
Fast forward from October 2009 to this week, and that bring us to:
Lighting
Going from three lights (two ceiling fixtures and one over the sink) to eleven should make things brighter, right?
After finding a fixture that we loved at a local store (who shall remain nameless because of their TERRIBLE customer service), we had to turn to Ebay for the fixture as it has been discontinued for a long time. So, thanks to the reuse culture of Ebay, we found the fixture and then turned to Schoolhouse Electric for the fixture to hang over the table. Schoolhouse Electric is a small company out of Portland, Oregon that uses handblown glass globes based on 150 year old molds to match the fixtures in schoolhouse from long ago. We went with one of the Black Line shades to call out the lovely black display cabinet we have in the room
Throw in four new can lights using dimmable CFL bulbs and some Xenon undercabinet lighting and we are good to go. Thanks to Angler Construction for the wonderful installation job.
So, now, all that is left is
Tile
We actually already have the tile having worked with Donna, a wonderful designer at Tile Sensations. We bought a warehouse overrun (yay, more reuse and a bargain) and then augmented with a lovely glass tile in green that will be the accent over the stove and sink. That installation will happen soon and I will post some photos when it does.
Stay tuned!